In my previous post
We understand the role Group and Role assignment Policy here
And then we saw how to work with Role Group here
In this post I will cover how to create a new Role Assignment policy and assigning the same to users.
So let’s login to EAC
To manage Role assignment policy, Select permission >> User Roles in EAC
We see there is a default Role Assignment policy under user roles.
This policy is applied to every mailbox user by default.
From the above screenshot we can see that only 4 roles are disabled on the Default policy
· MyProfile information
· My Distributions Groups
· My RetentionPolicies
· MyDiagnostics
So if we want to give some of our users access to these role we can setup a new assignment policy and apply that to users.
So lets Create One, Click on the Plus icon to add a new role assignment policy.
Give policy a meaning full name, and add some description.
Now select the roles you wants users to have.
NOTE : a user can only have one assignment policy.
And then save the policy.
Now we have a new role assignment policy, so lets assign it to a user.
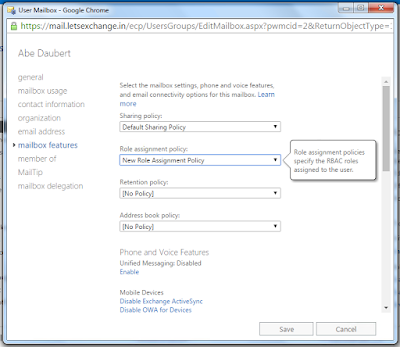
Under recipient management, edit user settings, go to Mailbox Features to assign Role Assignment Policy.
Select the newly created policy from the drop down and click on save.
So we have successfully created a new role assignment policy and assign same to the user.
We can also assign role assignment policy using PowerShell.
Use the below command
set-mailbox testuser1 –RoleAssignmentPolicy “Default Role Assignment Policy”
So this is the end of this post, In this post we covered how can we setup role assignment policy and apply the same to user using EAC and powershell.


Comments
Post a Comment